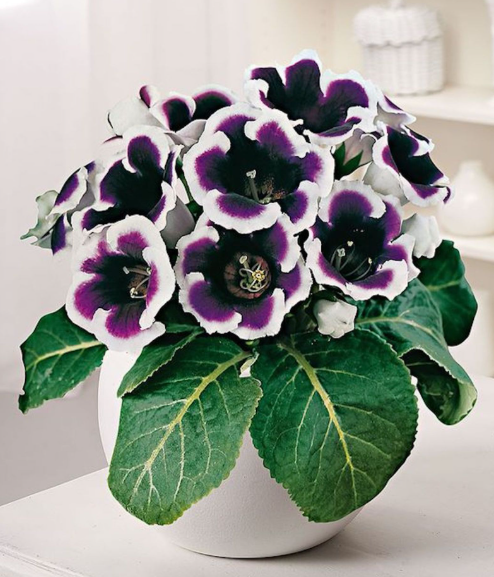
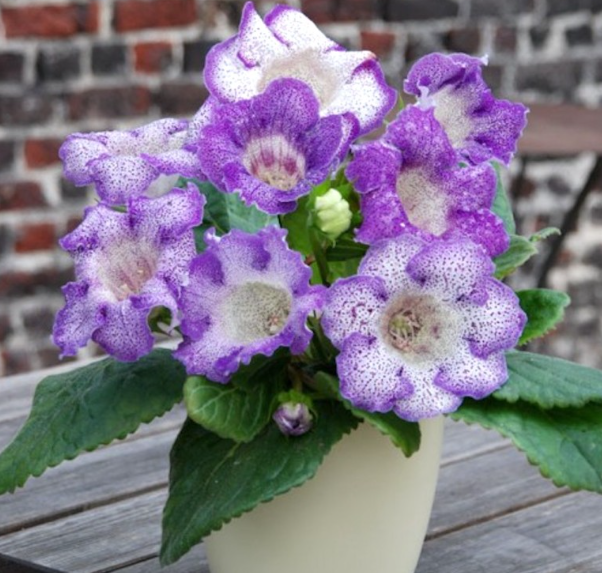
Gloxinia plants are truly the show-stoppers of the indoor plant world. Their large, bell-shaped flowers come in vibrant shades of red, purple, white, pink, and sometimes even bi-color, giving them an almost luxurious feel. What makes Gloxinia special is not just their beauty but their ability to bloom in small spaces, which is ideal for apartment dwellers or people who want eye-catching houseplants that don’t take over the room.
Gloxinia is often grown as a temporary flowering plant (like a seasonal gift), but with the right care, you can enjoy its blooms year after year. Whether you’re a plant parent or a beginner, this tropical treasure can add that “wow” factor to your plant collection.
🌿 What Are Gloxinia Plants?
At first glance, Gloxinia plants may seem like just another pretty face, but they have a fascinating structure and life cycle that make them quite unique. Botanically named Sinningia speciosa, Gloxinia are tuberous perennials. This means they grow from tubers (a thickened underground stem), which store nutrients and help the plant survive through dormant periods.
The flowers are shaped like oversized bells and come in a variety of shades and patterns. Each bloom feels like it’s made of velvet, adding a soft texture to your plant display. Gloxinia can produce a dozen or more blooms at once, making them truly spectacular when in full swing.
Key features of Gloxinia:
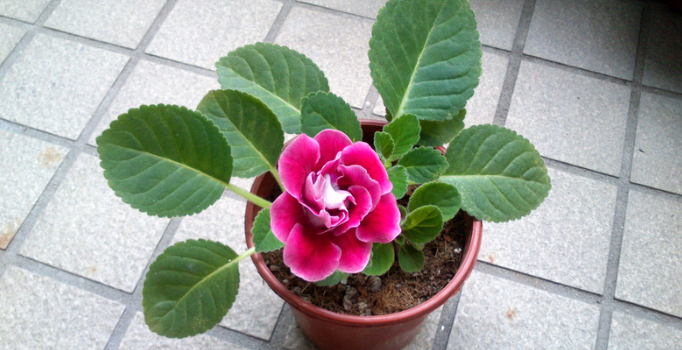
- Foliage: Deep green, fuzzy, and somewhat succulent leaves.
- Flowers: Trumpet- or bell-shaped with velvety petals.
- Root structure: Grows from a central tuber.
- Lifespan: Can live and bloom for years if allowed to rest during dormancy.
Many people confuse Gloxinia with African Violets, and while they share similarities, Gloxinia is typically grown for its big seasonal bloom, after which it enters a rest phase. This means it’s not a constant bloomer like some houseplants, but when it flowers—it’s worth the wait.
📜 History and Origin
Gloxinia’s roots (pun intended!) go back to the warm, humid rainforests of Brazil. They were first cataloged in the late 18th century and named after Benjamin Peter Gloxin, a German botanist known for his work with tropical plants. What started as a wild native species quickly captured the interest of European horticulturists, and the Gloxinia we grow today is the result of years of hybridization and careful breeding.
Originally, wild Gloxinia plants had smaller, less showy flowers, but as breeders experimented, they developed the large, ornamental blooms we now recognize. These efforts transformed Gloxinia from a curious wildflower into a beloved houseplant with dozens of cultivars.
The plant’s popularity skyrocketed in the 19th and 20th centuries when it became a favorite in Victorian glasshouses and conservatories. Since then, it has held a permanent spot in many indoor plant collections.
Here’s a quick timeline:
- 18th Century: First discovered in South America.
- 19th Century: Named after Gloxin and introduced to Europe.
- 20th Century: Widespread hybridization creates the modern varieties.
- Today: A staple in florist shops and indoor gardens around the world.
Gloxinia’s transformation from a rainforest plant to a modern household favorite is a testament to its adaptability and the love gardeners have for bold, beautiful blooms.
🌼 Popular Types of Gloxinia
There are several Gloxinia varieties, but the most popular and widely available is Sinningia speciosa. Over the years, horticulturists have created hybrids that differ in color, size, and bloom shape. Let’s break down the two most commonly recognized categories of Gloxinia plants.
Sinningia Speciosa
This is the “true” Gloxinia and the one most people recognize. It’s a tuberous perennial with large, ruffled flowers and soft, fuzzy leaves. These are usually grown as houseplants and can last several years with proper dormancy care.
Features:
- Large, ruffled flowers (up to 3 inches wide)
- Common colors: red, violet, white, and bi-color
- Grown from tubers
- Needs a rest/dormancy period
Florist Gloxinia
Often sold around Mother’s Day, Valentine’s Day, or Easter, these are usually hybrids bred for short-term display. While they look just as stunning, they may not grow back the next season since they’re treated as annuals in commercial settings.
Features:
- Bred for short-term indoor blooming
- May not regrow if tubers are weak or removed
- Often discarded after blooming
Indoor vs Outdoor Varieties
Gloxinia plants are typically grown indoors, but under the right conditions, they can also be cultivated outdoors. Understanding the difference between indoor and outdoor growing will help you decide where your Gloxinia will thrive best.
Indoor Gloxinia
Most people grow Gloxinia indoors because they are tropical plants that require stable, warm temperatures and high humidity. Indoors, you have more control over their environment.
Advantages of growing indoors:
- Temperature control: Gloxinia prefer a range of 65–75°F (18–24°C), which is easier to maintain inside.
- Protection from the elements: Wind, rain, and direct sun can damage their delicate leaves and flowers.
- Year-round enjoyment: Indoor setups can allow you to trick the plant into blooming more than once a year (with effort).
- Humidity control: Using a humidity tray or humidifier can mimic their native rainforest environment.
Outdoor Gloxinia
If you live in a USDA hardiness zone 10 or above, you may be able to grow Gloxinia outdoors year-round. In cooler climates, they can be moved outside during warm months but must be brought in when temperatures drop.
Considerations for outdoor Gloxinia:
- Partial shade is essential – too much direct sunlight will scorch the leaves.
- They must be protected from heavy rain – soggy soil can rot the tubers.
- Place in sheltered areas like patios, balconies, or greenhouses.
- Watch for pests like slugs, snails, and aphids, which are more common outside.
In short, Gloxinia are happiest indoors unless you’re in a tropical climate. Even then, careful placement and protection are crucial to keeping them healthy and blooming beautifully.
🛠️ How to Grow Gloxinia Plants from Seeds
Step-by-step guide:
- Get quality seeds – Buy from a reputable source to ensure germination success.
- Prepare the seed tray – Use a sterile seed-starting mix in a shallow tray or container.
- Sprinkle seeds – Gloxinia seeds are dust-like, so do not bury them. Just scatter them lightly over the surface.
- Mist gently – Use a spray bottle to moisten the soil without washing the seeds away.
- Cover and place in warmth – Cover the tray with plastic wrap or a humidity dome, and place it in a warm location (around 75°F or 24°C).
- Provide light – Use a grow light or place near a bright window, but avoid direct sun.
- Germination – This may take 2–4 weeks. Keep humidity high and avoid letting the soil dry out.
After germination:
- Transplant seedlings once they have 2–3 true leaves into small individual pots.
- Continue to grow in warm, bright, indirect light.
- After 6–9 months, tubers will start forming, and eventually, the plant will mature enough to bloom.
Tips for success:
- Be patient: Gloxinia from seed may take a year or more to bloom.
- Sterility is key: Avoid fungal infections by using sterile soil and clean tools.
- Use bottom-watering: Keeps the delicate seedlings upright and prevents damping off.
🧂 Propagating Gloxinia via Tubers and Cuttings
While growing from seed is possible, most Gloxinia growers prefer propagation from tubers or cuttings because it’s faster and more reliable.
Propagation via Tubers
This is the easiest and most effective way to grow more Gloxinia.
- Wait until the plant goes dormant – usually after flowering, when the leaves yellow and die back.
- Gently dig up the tuber – Be careful not to damage it.
- Divide if needed – If the tuber has multiple “eyes” (growth points), you can cut it into sections using a sterile knife. Each piece must have at least one eye.
- Dry before planting – Let the cut pieces dry for 1–2 days to form a callus.
- Plant in moist, well-draining soil – Keep the rounded side down and the eyes facing up.
- Water sparingly – Only water when soil feels dry to the touch.
Propagation via Leaf Cuttings
This is a bit trickier but doable.
- Choose a healthy, mature leaf.
- Cut the leaf with a short petiole (the small stem).
- Place the cut end in a small container with moist potting mix or water.
- Cover with a plastic dome or bag to maintain humidity.
- Roots will form in a few weeks, followed by tiny tubers and eventually leaves.
Why propagate?
- Save money: Create multiple plants from one.
- Preserve rare varieties: Especially useful for heirloom or unique hybrids.
- Faster results: Tubers and cuttings bloom much quicker than seeds.
🌞 Light Requirements for Gloxinia
Gloxinia plants need the right balance of light to thrive. Too much light can scorch the leaves, while too little light will result in leggy growth and no flowers.
Ideal light conditions:
- Bright, indirect light is best.
- East or north-facing windows are ideal.
- If using artificial light, provide 12–14 hours a day with fluorescent or LED grow lights.
Signs your Gloxinia is getting the right light:
- Healthy green leaves with no burn marks.
- Compact, upright growth.
- Abundant buds and blooms.
Signs of light problems:
- Too much light: Yellow or brown edges on leaves, faded flowers.
- Too little light: Long, spindly stems; few or no flowers.
Lighting tips:
- Rotate the pot weekly for even growth.
- Use sheer curtains to diffuse harsh sun.
- If light is low, consider a small desk grow light.
Soil Requirements
Soil is one of the most important elements in the life of a Gloxinia plant. These tropical beauties thrive in rich, well-draining soil that retains moisture but never becomes soggy. The key here is balance—too much moisture leads to root rot, but too little makes the plant wilt and stops blooming.
Ideal Soil Composition for Gloxinia:
- Peat moss or coco coir (50–60%) – These help retain moisture and create a slightly acidic pH (ideal range is 5.5–6.5).
- Perlite or vermiculite (30%) – These create air pockets in the soil and improve drainage.
- Compost or worm castings (10–20%) – Provide slow-release nutrients and support root development.
You can also buy pre-made African violet potting mix, which works wonderfully for Gloxinia due to similar soil preferences.
Soil Tips:
- Avoid garden soil—it compacts easily and holds too much water.
- Always use a pot with drainage holes to prevent root rot.
- Consider adding charcoal or sand for even better aeration in humid climates.
- Refresh the soil once a year to keep it nutrient-rich and prevent diseases.
Your Gloxinia’s health starts from the ground up—literally. With the right soil, you’re setting up a solid foundation for explosive blooms and healthy foliage.
💧 Watering Schedule for Gloxinia
Watering your Gloxinia plant might feel like a tightrope act at first—but once you get the hang of it, it becomes second nature. These plants love moist soil but absolutely hate sitting in water.
Watering Guidelines:
- Keep the soil evenly moist during the growing and blooming season.
- Reduce watering drastically during dormancy (when leaves start to yellow and die back).
- Use room temperature water to avoid shocking the roots.
- Always water at the base of the plant—keep the leaves and flowers dry to prevent rot and fungal infections.
How Often to Water:
- Spring and summer (active growth): Every 3–4 days, depending on humidity and light.
- Fall (transition to dormancy): Once every 7–10 days.
- Winter (dormancy): Once every 3–4 weeks, or not at all if the tuber is completely dry and stored.
Signs of Watering Issues:
| Symptom | Possible Cause |
|---|---|
| Wilting + soggy soil | Overwatering |
| Dry leaves + dry soil | Underwatering |
| Yellowing leaves | Water stress or rot |
Pro tip: Try bottom watering by placing the pot in a shallow dish of water for 20–30 minutes. The soil soaks up moisture without wetting the crown or leaves—perfect for Gloxinia!
🌿 Fertilizing Tips for Gloxinia
Feeding your Gloxinia plant is like giving it a well-balanced diet—too little, and it becomes weak and stunted; too much, and you risk chemical burn or root damage. A thoughtful fertilizing schedule will encourage lush foliage and jaw-dropping blooms.
Best Fertilizers for Gloxinia:
- Balanced liquid fertilizer (e.g., 20-20-20 or 10-10-10) – Use during active growth and blooming stages.
- Bloom booster (e.g., 15-30-15) – Use every 2–3 weeks during flowering to support bigger and brighter blooms.
- Slow-release pellets – Good for long-term feeding, especially if you forget to fertilize often.
How to Fertilize Gloxinia:
- Start feeding after new growth appears in spring or after tuber sprouting.
- Dilute fertilizer to half strength to avoid burning sensitive roots.
- Apply every 2 weeks during the growing season (spring through early fall).
- Stop feeding entirely during dormancy. The plant won’t absorb nutrients at that time.
Signs of Over or Under-fertilizing:
- Too much fertilizer: Leaf tips turn brown, white crust on soil.
- Too little fertilizer: Pale leaves, slow growth, fewer flowers.
Pro tip: Flush the soil every 1–2 months with plain water to remove any salt buildup from fertilizers.
A well-fed Gloxinia is a happy Gloxinia—ready to put on a long, colorful bloom show that lasts for weeks
Common Problems & Solutions with Gloxinia
Despite being relatively easy to care for, Gloxinia plants are not immune to problems. From wilting leaves to flower drop, issues can creep in quickly if conditions aren’t just right. The good news? Most common problems have simple fixes.
1. Yellowing Leaves
Causes:
- Overwatering or poor drainage
- Nutrient deficiency
- Natural die-back during dormancy
Solutions:
- Check the soil—if it’s soggy, reduce watering.
- Ensure pot has drainage holes.
- Add a balanced liquid fertilizer if leaves seem pale.
2. No Flowers or Bud Drop
Causes:
- Insufficient light
- Inconsistent watering
- Overfertilization with high nitrogen formulas
Solutions:
- Move plant to a brighter location (indirect sunlight).
- Keep soil evenly moist.
- Switch to a bloom booster fertilizer (high phosphorus).
3. Leaf Spots or Mildew
Causes:
- Watering over the foliage
- Poor air circulation
- High humidity without airflow
Solutions:
- Always water at the base.
- Use a small fan to increase airflow in humid rooms.
- Remove affected leaves and treat with neem oil or fungicide.
4. Pest Infestation
Common pests: Aphids, mealybugs, spider mites
Solutions:
- Wipe leaves with insecticidal soap or neem oil.
- Isolate the plant to prevent spread.
- Regularly inspect undersides of leaves and stems.
Quick Tip: Stay proactive. Weekly plant checkups prevent small issues from becoming big headaches.
🍂 Seasonal Care for Gloxinia
Understanding Gloxinia’s natural cycle is key to keeping your plant healthy year-round. Gloxinia plants follow a seasonal pattern of active growth, blooming, and dormancy. Adjusting your care based on the season can make the difference between a thriving plant and a struggling one.
🌸 Spring & Summer (Active Growth + Blooming)
- Keep in bright, indirect sunlight.
- Maintain humidity (50–60%) and water consistently.
- Feed every 2 weeks with a balanced or bloom-boosting fertilizer.
- Rotate the pot weekly to encourage even growth.
- Remove spent flowers to encourage new blooms.
🍁 Fall (Transition Period)
- You’ll notice yellowing leaves and fewer flowers—this is normal.
- Gradually reduce watering as the plant prepares to rest.
- Stop fertilizing once blooming ends.
- Allow foliage to die back naturally—don’t force it!
❄️ Winter (Dormancy)
- Once the leaves die back completely, cut them off at the base.
- Store the tuber in its pot or remove it, and keep it in a cool, dry place (around 50–60°F or 10–16°C).
- Water sparingly (once a month or not at all).
- Avoid fertilizing or disturbing the tuber.
🌱 Spring (Reawakening)
- Begin lightly watering again.
- Move the plant to a warm, bright spot.
- Once you see new growth, resume regular care and feeding.
Seasonal care tip: Think of Gloxinia like a battery-powered bloom machine—it needs a recharge (dormancy) before it can give another full flower show.
🪴 Repotting Guide for Gloxinia
Repotting your Gloxinia isn’t just about giving it more space—it’s also about refreshing the soil, checking for pests or rot, and encouraging healthy new growth. Most Gloxinia plants benefit from repotting once a year, usually in early spring right before they wake up from dormancy.
When to Repot Gloxinia:
- After dormancy, when tubers begin to sprout
- If the soil looks compacted or moldy
- When the pot is overcrowded or roots are circling the bottom
Steps to Repot Gloxinia:
- Choose a pot that’s 1–2 inches wider than the previous one.
- Always use pots with drainage holes.
- Prepare fresh soil:
- Use a mix of peat moss + perlite + compost or African violet mix.
- Remove the tuber gently:
- Brush off old soil and inspect the tuber for rot or damage.
- Plant the tuber:
- Place it in the center of the new pot with the eye facing up.
- Bury it about halfway in the soil, keeping the crown just above the surface.
- Water lightly:
- Keep soil slightly moist until you see active growth.
- Place in bright, indirect light:
- Avoid direct sun until leaves fully develop.
Post-repotting care tips:
- Don’t fertilize for the first 2–3 weeks after repotting.
- Mist the soil, not the leaves, to maintain humidity without causing rot.
- Be patient—your plant may take a few weeks to adjust.
Repotting gives your Gloxinia a fresh start. With new soil and room to grow, your plant is set up for a successful and vibrant blooming season..
Conclusion
Gloxinia plants are an extraordinary blend of vibrant beauty and manageable care, making them a favorite among houseplant enthusiasts and beginner gardeners alike. Their velvety, trumpet-shaped flowers and soft, fuzzy leaves add a touch of tropical elegance to any indoor space. Whether you’re growing them from seed, propagating from tubers, or picking up a flowering plant from your local nursery, Gloxinia offer an experience that’s both visually stunning and deeply satisfying.
So, whether you’re looking to add a pop of color to your home, gift a flowering beauty, or dive into the fun of plant propagation, Gloxinia is a brilliant choice. Once you grow one, you may find yourself wanting more—because one simply isn’t enough!
❓FAQs
1. How long do Gloxinia flowers last?
Gloxinia flowers typically last between 4 to 8 weeks if cared for properly. With consistent watering, indirect light, and proper humidity, you can enjoy their vibrant blooms for over a month.
2. Do Gloxinia plants bloom more than once a year?
Yes! While Gloxinia are often grown as a single-season bloom, with proper rest during their dormancy period and good care, they can rebloom annually—sometimes even twice a year in ideal conditions.
3. Why are my Gloxinia leaves turning yellow?
Yellowing leaves can be a sign of overwatering, poor drainage, or the start of dormancy. Always check the soil moisture, ensure the pot has drainage holes, and reduce watering if the plant is entering its rest phase.
4. Can I grow Gloxinia without a greenhouse?
Absolutely. Gloxinia thrive indoors with bright, indirect sunlight. You don’t need a greenhouse—just a warm, humid spot in your home and some plant-loving attention.
5. What should I do when my Gloxinia goes dormant?
Once the plant’s leaves start to yellow and die back, stop watering and let it rest. Store the tuber in a cool, dark place for 8–12 weeks. After this rest period, resume watering and place it in bright light to encourage new growth.