If you’re looking to add a splash of the tropics to your home or garden, Bromeliad Orchids are just what the plant doctor ordered. With their vibrant colors, unique leaf formations, and low-maintenance appeal, they’re turning ordinary spaces into exotic paradises. But what exactly is a bromeliad orchid? And how do you keep one thriving? Let’s dive in.
Understanding the Bromeliad Family

Difference Between Bromeliads and Orchids
Despite the name “bromeliad orchid,” these two plant types belong to separate botanical families. Bromeliads are part of the Bromeliaceae family, while orchids belong to the Orchidaceae family. They share similar care needs but are biologically different.
Popular Varieties Within the Bromeliad Family
There are over 3,000 species of bromeliads. Some popular varieties include:
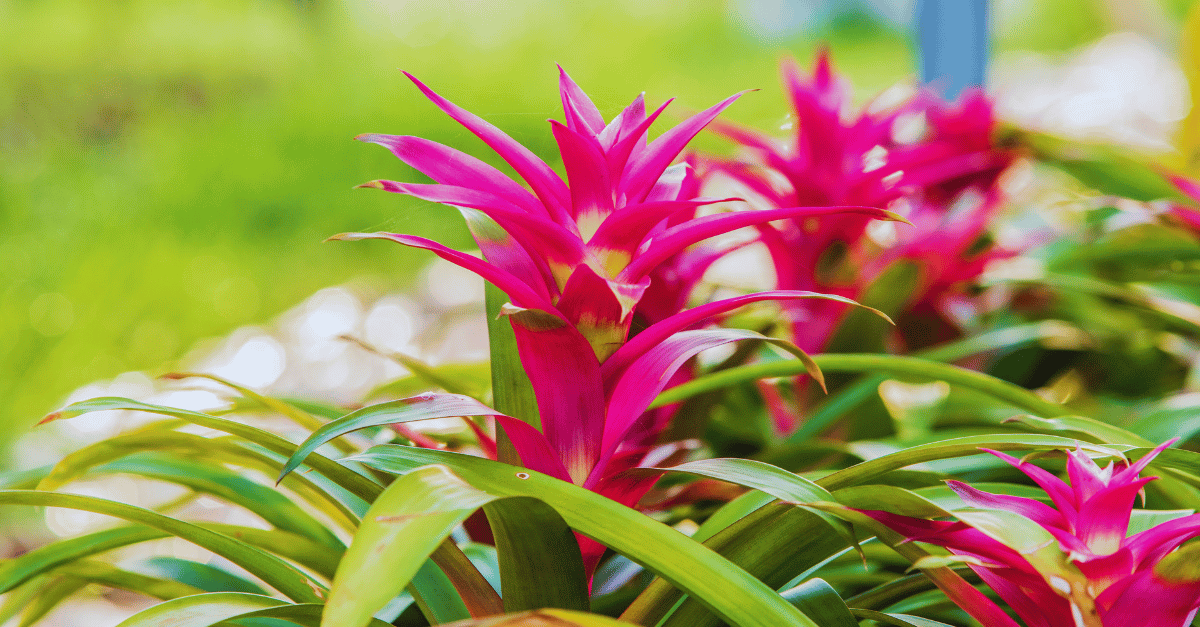
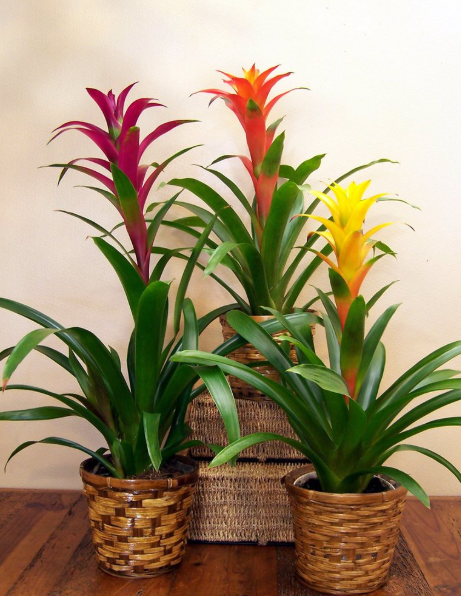
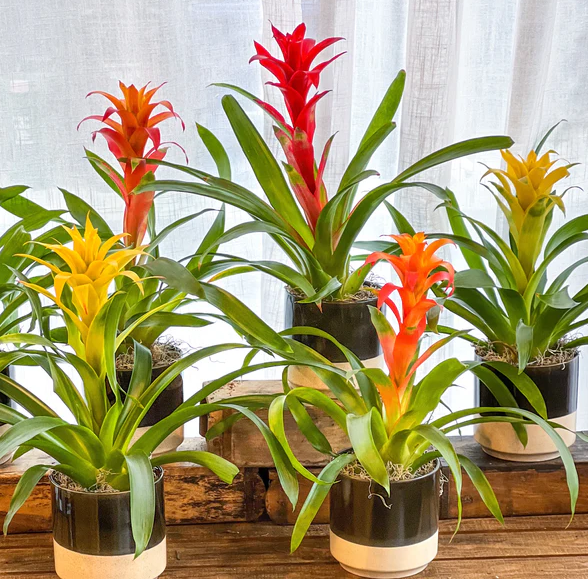
- Guzmania – known for its vibrant, central flower spike.
- Aechmea – characterized by colorful bracts and long-lasting flowers.
- Neoregelia – prized for its colorful foliage more than its flowers.
Epiphytic Nature Explained
Most bromeliads, like orchids, are epiphytes. That means they grow on trees or other plants, drawing moisture and nutrients from the air and rain. No, they’re not parasites—they’re just very chill roommates.
Are Bromeliad Orchids Real Orchids?
The term “bromeliad orchid” is often used loosely, leading to confusion among plant enthusiasts. Let’s set the record straight. While both bromeliads and orchids are tropical epiphytes and share similar environments and care needs, they are not the same plant—nor are they hybrids of each other. Botanically, bromeliads belong to the Bromeliaceae family, while orchids are members of the Orchidaceae family. That’s like saying a cat and a dog are the same just because they both have fur and four legs.
So why the mix-up? The confusion often arises due to the exotic appearance and overlapping habitats of these plants. Both love humidity, filtered light, and mounting or growing in well-draining media, so they’re often sold or displayed together in nurseries and garden centers. Sometimes, you’ll even find Guzmania bromeliads labeled as ‘orchid-like plants’ due to their central bloom spike that mimics orchid flower sprays.
It’s also worth noting that some people refer to orchid-like bromeliads or “bromeliad orchids” when they talk about Tillandsia (air plants) that produce delicate, orchid-esque flowers. However, no such thing as a true bromeliad-orchid hybrid exists in nature or horticulture.
Understanding the difference helps ensure you’re giving each plant what it truly needs to thrive. Orchids may prefer more structured watering routines and specific potting mixes like sphagnum moss or bark, while bromeliads are content with water in their central cup and can even grow without soil.
In short, calling a bromeliad an orchid is like calling pineapple a coconut—it’s close in vibe, but scientifically way off. Now that we’ve cleared the air, let’s look at how to choose the right bromeliad for your space.
Choosing the Right Bromeliad for Your Space
Selecting the perfect bromeliad for your home isn’t just about picking the prettiest plant on the shelf. These tropical wonders come in all shapes, colors, and sizes—each with their own growing preferences and personality. Whether you’re a seasoned plant collector or a newbie green thumb, knowing how to choose the right bromeliad will make all the difference in how well it thrives in your space.
First, consider light conditions. Bromeliads love bright, indirect sunlight. A spot near an east-facing window is usually ideal. If you live in a shadier home, go for Guzmania or Vriesea, which tolerate low light better than other varieties. For those with sunnier homes or grow lights, Aechmea and Neoregelia are excellent choices—they love more intense light and show off with vibrant leaf colors.
Next up is humidity. Bromeliads are native to tropical and subtropical climates. They enjoy environments with 50% humidity or higher. If your home tends to be dry, especially in winter, consider using a humidifier or placing a tray of water with pebbles near your plant. Bathrooms and kitchens are naturally more humid and often great locations.
Then think about size and structure. Some bromeliads grow upright with tall flower spikes, while others spread out low and wide. Compact varieties like Tillandsia are perfect for desks and shelves, while larger types like Aechmea fasciata make striking statement pieces in living rooms.
Also, check whether the plant is terrestrial or epiphytic. Some bromeliads grow well in soil, while others prefer to be mounted on driftwood or bark. Decide based on your display style.
How to Plant a Bromeliad Orchid
Planting a bromeliad (often called a bromeliad orchid by mistake) is surprisingly simple and fun, even for beginners. Whether you’re working with a potted variety or a mounted epiphyte, getting the basics right from the start sets your plant up for long-term success.
Start by choosing the right container and soil mix. Bromeliads don’t like soggy roots. They thrive in well-draining media, so opt for a potting mix made for orchids or cacti, or make your own with equal parts bark, perlite, and peat moss. Avoid heavy garden soil—it holds too much moisture and can suffocate the roots.
Next, consider the plant’s growth habit. If you’re dealing with a terrestrial bromeliad, plant it in a pot with plenty of drainage holes. Gently remove it from its nursery pot and shake off any old soil. Nestle the plant into its new home, making sure the central “cup” or rosette is upright. This central part is how many bromeliads collect water.
For epiphytic types, like Tillandsias, you don’t need a pot at all. Mount them on driftwood, cork bark, or hanging displays using garden wire or non-toxic glue. These plants draw moisture and nutrients from the air, so mist them regularly and soak them in water once a week.
When placing your newly planted bromeliad, keep it in a warm area with bright, indirect sunlight. Avoid direct rays that could scorch the leaves. Water by filling the central cup, not just the soil, and flush it out every few weeks to prevent salt build-up or mosquito breeding.
Don’t forget: bromeliads don’t require frequent feeding, but a diluted liquid fertilizer once a month during the growing season (spring and summer) keeps them happy.
Planting a bromeliad is more about recreating a tropical environment than forcing a routine. Once you get into the rhythm of its needs, this stunning plant becomes an easy-care addition to your collection.
Caring for Your Bromeliad Orchid
Taking care of your bromeliad orchid (or more accurately, your bromeliad plant) doesn’t require a green thumb—just a bit of know-how and consistency. These tropical beauties are low-maintenance once you understand their rhythm.
Light is crucial. Bromeliads prefer bright but indirect sunlight. Place them near a window with filtered light, such as behind a sheer curtain. If the leaves turn pale or scorched, it’s getting too much sun. On the other hand, if it’s losing color or stretching out, it may need more light.
When it comes to watering, bromeliads are unique. Most don’t absorb water through their roots like typical houseplants. Instead, they draw moisture from their central “tank” or cup. Keep this cup filled with fresh, filtered water (avoid tap water high in chlorine or fluoride). Empty and rinse it every couple of weeks to prevent stagnation and bacteria growth.
For humidity, aim for 50–70%. If your indoor air is dry, mist the leaves or use a humidifier nearby. Placing the plant on a humidity tray (a shallow dish filled with pebbles and water) is another great trick.
Temperature-wise, bromeliads are comfortable in 65–80°F (18–27°C). They don’t like cold drafts, so keep them away from windows during winter or air vents that blow directly on them.
Feeding your bromeliad is easy. During the growing season, apply a diluted, balanced liquid fertilizer every 3–4 weeks. You can pour it into the soil or add it to the central cup—but don’t overdo it. Too much fertilizer can burn the plant.
Finally, watch for pups! After flowering, the mother plant will eventually die, but not before producing baby plants at its base. These offsets can be removed and replanted once they reach about one-third the size of the original plant.
By following these simple steps, your bromeliad can brighten up your home for years—and maybe even produce a whole family of vibrant tropical wonders.
Watering Requirements and Mistakes to Avoid
Watering a bromeliad orchid (or bromeliad, to be accurate) can feel a little counterintuitive at first—especially if you’re used to traditional houseplants. But once you understand their unique structure and preferences, it becomes second nature.
Unlike many plants, bromeliads absorb most of their moisture through their central rosette or “tank,” not just through their roots. This cup-shaped part of the plant is designed to collect rainwater in the wild. So, when you water, your goal is to fill this central cup with clean, filtered water. Tap water with high levels of fluoride, chlorine, or salts can damage the plant, so opt for rainwater, distilled water, or filtered water whenever possible.
It’s important to flush the cup at least every 1–2 weeks to remove stagnant water, which can breed bacteria, attract pests, or cause rot. Simply pour fresh water through the cup and let it drain out to refresh it.
The root system still matters, but it’s more about anchoring the plant than absorbing moisture. You should still water the soil lightly, just enough to keep it barely moist—not wet. Let the soil dry out slightly between waterings.
Common Watering Mistakes:
- Overwatering the soil: Bromeliads hate soggy roots. Overwatering can lead to root rot, especially in poorly draining soil.
- Using dirty or hard water: Mineral build-up from tap water can scorch the leaves and hurt the plant over time.
- Letting water sit in the cup too long: This invites mold, fungus, and even mosquito larvae.
- Ignoring environmental changes: During cooler months, the plant requires less water, especially in low humidity environments.
Lighting and Temperature Needs
Bromeliads love warmth and light but not in excess. They do best in bright, indirect sunlight. South- or east-facing windows are ideal as long as direct midday sun doesn’t burn the leaves. Some species, like Guzmania and Vriesea, are more shade-tolerant, while others like Neoregelia enjoy more light and will reward you with vibrant colors when well lit.
Avoid placing your bromeliad in direct afternoon sun, especially during summer, as the intense light can scorch its leaves. If you notice brown leaf tips or faded colors, that could be a sign of too much light. If your bromeliad’s growth is slow or leaves become elongated, it may not be getting enough.
As for temperature, bromeliads enjoy warmth. Keep them in temperatures between 60–80°F (16–27°C). They can handle occasional dips but not prolonged cold. Never let them sit near cold drafts or heaters that blow dry air, which stresses the plant.
Humidity is another big factor—50% or higher is best. If your home is dry, use a humidifier or mist regularly. Bathrooms and kitchens are great spots if there’s enough light. Balanced lighting and warmth will make your bromeliad feel right at home.
Fertilizing Tips for Healthy Growth
Bromeliads are light feeders, so less is more when it comes to fertilizer. Use a diluted, balanced liquid fertilizer (like 10-10-10) once a month during the growing season (spring through summer). Avoid fertilizing during the fall and winter.
Apply the fertilizer directly into the soil or the central cup depending on the species. Be cautious—too much fertilizer can damage the plant, causing leaf burn or stunted growth.
For air plants (Tillandsia), use a foliar spray and mist the leaves. Specialized bromeliad or orchid fertilizers work well too.
Organic options like compost tea or fish emulsion can be gentler and eco-friendly. No matter your choice, always flush the cup every few weeks to prevent salt buildup.
Common Problems and How to Fix Them
- Yellowing leaves: Often caused by overwatering or poor drainage. Let the soil dry out more between waterings.
- Leaf tips turning brown: Could be too much sun or dry air. Try increasing humidity or moving the plant to filtered light.
- No blooming: Bromeliads bloom once in their life. Make sure they have enough light, and try the apple trick (placing a ripe apple nearby in a bag for a week) to encourage blooming.
- Pests: Watch for mealybugs or scale. Use neem oil or insecticidal soap.
How and When Do Bromeliads Bloom?
Bromeliads only bloom once in their lifetime, usually lasting for weeks to months. The bloom is the plant’s final show before it begins producing pups.
Blooming depends on the species and conditions. Warmth, bright light, and proper care encourage blooming. Some gardeners use the “apple trick”—placing a bromeliad in a clear plastic bag with a ripe apple for a week. The ethylene gas released by the apple can trigger flowering.
After blooming, don’t discard the plant. It will produce offsets or pups that can grow into full plants.
Propagating Bromeliads: How to Grow New Plants from Pups
Once your bromeliad has bloomed, look near its base for small shoots. These are pups—baby plants that will eventually replace the mother.
Wait until each pup is at least one-third to half the size of the mother plant before removing it. Use a clean, sharp knife to separate it.
Plant the pup in well-draining soil, and treat it like a mature bromeliad. With time and care, these pups will bloom and produce their own pups—a beautiful cycle of growth.
Using Bromeliads in Home Décor and Landscaping
Bromeliads bring a tropical, exotic flair to any setting. Indoors, they add bright pops of color and texture to shelves, countertops, or hanging displays.
Outdoors, they make stunning landscape plants in warm climates. Try planting them under trees or in shaded garden beds. Even in colder zones, they can thrive in containers moved indoors in winter.
Air plants (Tillandsia) can be mounted on wood, stones, or shells for artistic wall décor. Use bromeliads to make living walls, terrariums, or centerpieces—their styling options are endless.
Toxicity and Safety for Pets
Bromeliads are non-toxic to cats, dogs, and humans, making them a great choice for pet owners. While curious pets might chew on the leaves, there’s no danger if they nibble occasionally.
Still, it’s best to keep any plant out of reach to avoid mess or damage to the plant. Some bromeliads have sharp-edged leaves, so caution is wise for playful paws.
Final Thoughts: Why the Bromeliad Orchid Belongs in Every Home
The bromeliad orchid—whether you call it that or just a bromeliad—is a low-maintenance, high-impact plant. With their otherworldly blooms, bright foliage, and unique watering habits, they bring a touch of the tropics to any home.
Perfect for beginners and pros alike, bromeliads are forgiving, rewarding, and endlessly fascinating. From their dramatic flowers to their easy propagation, they prove that beauty doesn’t have to be high-maintenance.
So why not add one to your collection? With just a bit of care and understanding, your bromeliad will thrive and delight for years to come.
FAQs
1. How long do bromeliads live?
Bromeliads typically live 2–5 years. After blooming, the main plant will eventually die, but it produces pups that can live on.
2. Can bromeliads grow in water?
No. Bromeliads do not grow like traditional hydroponic plants. However, they can be misted or soaked if they’re air plants (Tillandsia).
3. Do bromeliads clean the air?
Yes! Like many houseplants, bromeliads can improve indoor air quality by filtering toxins.
4. Why isn’t my bromeliad blooming?
Lack of light is the most common reason. Make sure it’s getting enough bright, indirect sunlight. Try the apple trick for a boost.
5. Is the bromeliad orchid a real orchid?
No, it’s not. While often confused with orchids due to their beauty and structure, bromeliads are a separate family of tropical plants.