Tulips are among the most beloved spring flowers, renowned for their vibrant colors and elegant shapes. While many people plant tulips directly in garden beds, growing them in pots has become increasingly popular. Planting tulip bulbs in pots allows you to enjoy bursts of color on balconies, patios, or even indoors.
It also gives more control over soil quality, positioning, and design, making it an excellent option for beginner gardeners or those with limited outdoor space. Unlike traditional ground planting, pot planting gives you flexibility—you can move the pots around to catch sunlight or arrange them decoratively. Plus, it keeps the bulbs safe from garden pests. If you’ve ever dreamed of creating a mini tulip garden right outside your window, pots are the perfect solution. Let’s explore how you can grow healthy, blooming tulips in containers step by step.
Why Choose Pots Over Garden Beds?
Planting tulips in pots has several unique advantages over traditional garden beds. First, pots are portable—you can place them anywhere, whether it’s a sunny balcony, a shaded corner, or even indoors near a window.
This means your tulips can be showcased in different parts of your home or garden depending on the season. Second, pots allow better soil control. In garden beds, soil may be heavy, clay-based, or waterlogged, which isn’t ideal for tulips. With pots, you can create the perfect well-draining mix tailored to bulb growth. Third, container planting offers protection against pests like rodents or insects that often dig up bulbs. Another benefit is the design flexibility—potted tulips can be arranged in groups, mixed with other spring flowers, or used as centerpieces. So, if you’re short on space or want a low-maintenance option, pots are a smart and stylish choice.
Best Time to Plant Tulip Bulbs in Pots
Timing is crucial when it comes to planting tulip bulbs in pots. Tulips require a period of cold dormancy to trigger proper blooming in spring. The best time to plant them is in the fall, typically from late September to November, depending on your climate. Ideally, you should plant tulip bulbs before the ground freezes but after the weather cools down. In warmer climates, you might need to refrigerate the bulbs for 8–10 weeks before planting, as they won’t get enough natural cold exposure. By planting at the right time, you give the bulbs enough opportunity to establish roots before winter sets in. This ensures they’ll wake up strong and ready to produce stunning flowers as soon as spring arrives. Waiting too late risks poor growth, while planting too early may cause premature sprouting. Follow the seasonal rhythm, and your tulips will reward you with breathtaking blooms.
Choosing the Right Pot
Size and Depth of the Pot
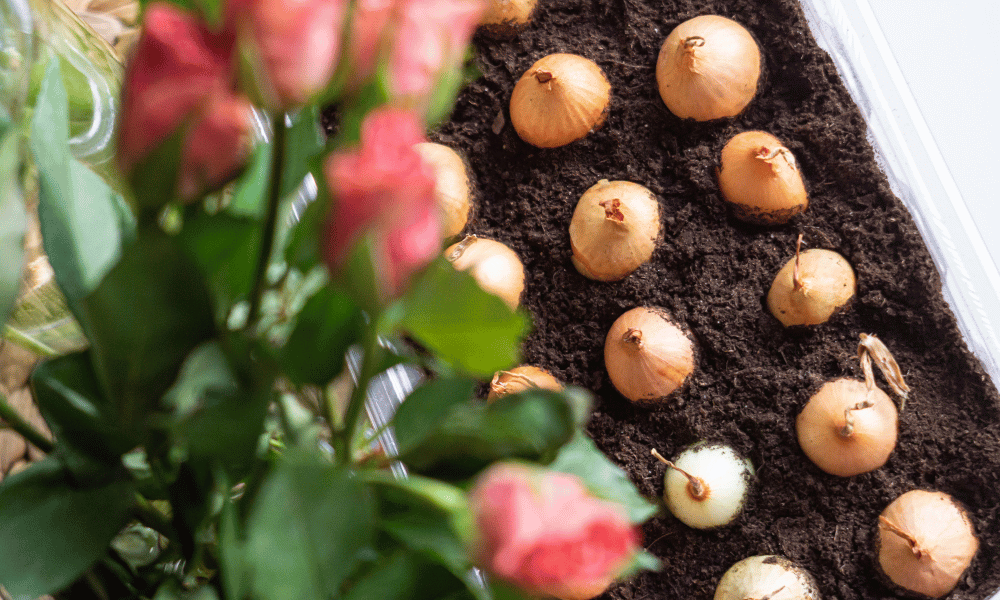
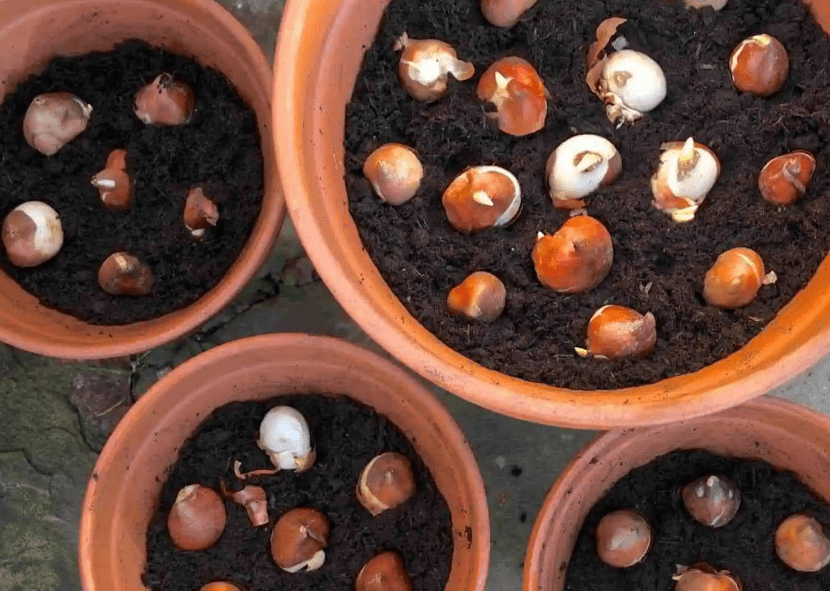
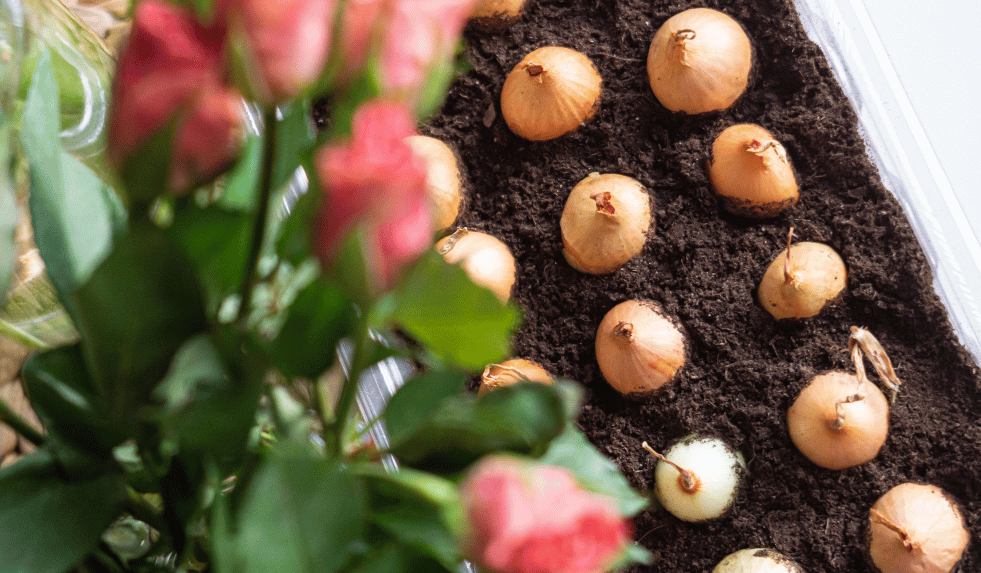
The size and depth of your pot play a big role in tulip success. Tulip bulbs generally need to be planted 6–8 inches deep, so your pot should be at least 10–12 inches in depth to accommodate the roots and provide enough insulation during cold weather. The width of the pot depends on how many bulbs you want to plant, but wider pots allow for creative arrangements and layering techniques. A cramped pot won’t give bulbs enough room to grow, leading to weak or small flowers. On the other hand, overly large pots may be difficult to move and require more soil. A medium-to-large container, around 12–16 inches in diameter, usually works well for most tulip varieties. Remember, tulip bulbs prefer to grow close together for a fuller display, so balance depth with enough surface area for multiple bulbs.
Material Options for Pots
The material of your pot influences not just its appearance but also the health of your tulips. Terracotta and clay pots are popular because they provide excellent breathability and prevent waterlogging, but they can dry out quickly and may crack in freezing temperatures. Plastic pots are lightweight, affordable, and durable, making them a good choice for beginners, though they may not look as elegant. Wooden containers offer a rustic charm but need proper lining to prevent rotting over time. Metal pots are stylish but may heat up too quickly under direct sunlight, stressing the bulbs. Ceramic pots can be beautiful but are often heavy and fragile. Ideally, choose a pot material that suits your climate and gardening style. For cold regions, frost-resistant containers are best, while for warm climates, breathable pots help regulate soil temperature. Whichever you pick, always ensure it has adequate drainage.
Drainage Importance
Tulips hate sitting in soggy soil, and poor drainage is one of the most common reasons bulbs fail to bloom. That’s why having proper drainage in your pot is essential. Without it, excess water can cause the bulbs to rot before they even sprout. Choose a pot with at least one large drainage hole at the bottom. If your pot doesn’t have one, you can drill a hole or place a layer of gravel, stones, or broken pottery at the base to help water escape. Using a well-draining soil mix also complements this. Some gardeners even place the pot on pot feet or risers to prevent water from pooling underneath. Remember, it’s always better to water slightly less than risk drowning your bulbs. Good drainage ensures your tulips have a healthy environment to develop strong roots and bloom beautifully in spring.
How to Identify Healthy Bulbs
Choosing the right bulbs is the foundation of successful tulip planting. Healthy tulip bulbs should feel firm to the touch, not soft or mushy. Avoid bulbs that show signs of mold, damage, or shriveling, as these are unlikely to bloom well. Look for bulbs that are plump, heavy for their size, and free of blemishes. Bigger bulbs often produce larger, stronger flowers compared to smaller ones. When buying in bulk, inspect a few from the bag to ensure quality. If purchasing online, opt for reputable sellers with good reviews. Remember, a weak bulb can’t magically turn into a strong plant—what you put in the soil directly affects what blooms in spring. Healthy bulbs are like healthy seeds; they carry all the energy needed for a vibrant flower display.
Different Tulip Varieties for Pots
Not all tulips are equally suited for container planting. Some varieties adapt better to pots due to their size and growth habits. Here are a few popular choices:
- Single Early Tulips – Compact, early bloomers perfect for smaller pots.
- Triumph Tulips – Strong stems and mid-season blooms, ideal for decorative pots.
- Double Tulips – Also called “peony tulips,” they provide lush, full flowers.
- Miniature Tulips – Great for small pots and indoor displays.
- Fringed or Parrot Tulips – Add unique textures and colors to mixed arrangements.
When selecting, consider bloom time (early, mid, or late season) so you can plan a continuous display. Mixing different varieties in one pot creates layers of color and extends the blooming season.
Preparing the Soil for Tulips in Pots
Best Soil Mix for Tulips
Tulips thrive in light, well-draining soil. Garden soil alone is usually too heavy for pots, so create a custom mix for the best results. A good potting soil recipe includes:
- 50% high-quality potting mix
- 25% coarse sand or perlite (for drainage)
- 25% compost or organic matter (for nutrients)
This balance keeps the soil airy while providing enough food for the bulbs. Avoid soils that retain too much moisture, as they can cause bulb rot. Tulips like slightly sandy conditions, so don’t be afraid to add grit. Also, ensure the soil is loose and crumbly, not compacted. Good soil preparation is like setting the stage—once the bulbs are tucked in, they’ll have the perfect environment to grow strong and bloom beautifully.
Adding Fertilizers and Compost
Tulip bulbs come with stored energy, but they benefit from a nutrient boost. Before planting, mix slow-release bulb fertilizer or bone meal into the soil. This helps strengthen root development during winter. Compost is another great addition, enriching the soil with organic nutrients and improving structure. However, avoid using fresh manure—it can burn the bulbs or introduce harmful bacteria. After planting, you can top-dress with more compost or fertilizer in early spring to support blooming. For long-lasting results, stick to fertilizers labeled for bulbs and flowers, not general-purpose ones. Think of it like feeding your plants a balanced diet—stronger roots, healthier plants, and more vibrant flowers are the reward.
Step-by-Step Guide to Planting Tulip Bulbs in Pots
Depth and Spacing of Bulbs
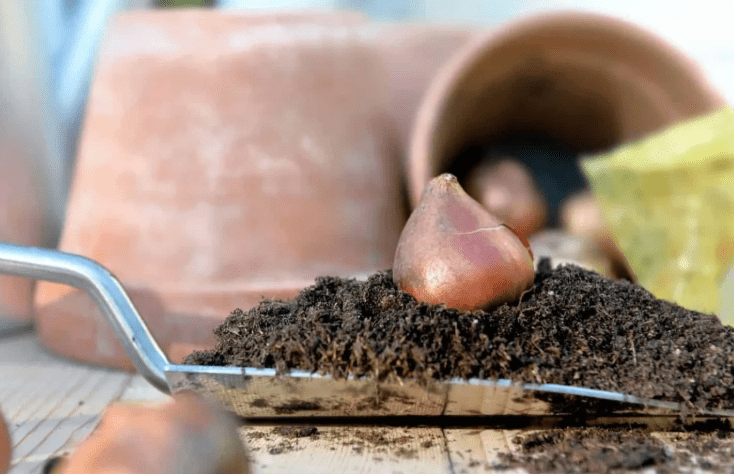
Planting depth is critical for tulips. A good rule is to plant bulbs at a depth about three times their height. For tulips, that usually means 6–8 inches deep. In pots, you can plant them slightly closer together than in garden beds, but avoid crowding. Space bulbs about 1–2 inches apart for a lush, full display. Position them with the pointed end facing upward—this is where the stem will emerge. If you plant them upside down, they may still grow but will take longer and use up valuable energy. Proper spacing ensures each bulb has enough room to develop without competing too much for nutrients.
Layering Technique (Lasagna Planting)
Want your pots to bloom for weeks instead of all at once? Try the layering method, also known as “lasagna planting.” Here’s how it works:
- Place the largest, latest-blooming bulbs (like tulips) at the bottom.
- Add a layer of soil, then plant mid-season bulbs like daffodils.
- Add another soil layer, then top with early bloomers like crocuses.
This way, as one layer finishes blooming, another begins—giving you a continuous wave of flowers. It’s like building a cake with different layers, each offering something new. Not only does it maximize space, but it also creates a spectacular pot bursting with color all season long.
Covering and Positioning the Pot
After planting, cover the bulbs with soil and gently firm the surface. Water lightly to settle the soil, but don’t drench it. Then, decide where to place your pot. During winter, tulip bulbs need a cool, sheltered spot to simulate natural dormancy. A shaded balcony, garage, or even an unheated shed works well. Make sure the pots are protected from heavy rain, which can waterlog the soil. Once spring approaches, move the pots into a sunny location to encourage growth. Positioning is important—enough cold in winter, then enough sunlight in spring is the winning combination.
How Often to Water Tulip Bulbs
Watering is a delicate balance for tulips. At planting time, water just enough to settle the soil. After that, tulip bulbs don’t need much water until spring. Overwatering is a common mistake and can cause rot. In winter, natural rainfall or occasional watering is usually enough. As temperatures warm and growth begins, increase watering slightly, keeping the soil moist but never soggy. A simple tip is to check the soil with your finger—if the top inch feels dry, it’s time to water. Consistent but moderate moisture will keep your tulips healthy and ready to bloom.
Sunlight and Temperature Needs
Tulips are sun-lovers and perform best with at least 6 hours of direct sunlight daily. Place your pots in a bright spot once the shoots emerge in spring. Without enough sun, tulips may grow weak, tall, and floppy, with smaller flowers. Temperature also matters—tulips need cool winters to develop properly, followed by moderate spring warmth. In warmer climates, pre-chilling the bulbs before planting is essential. During peak heat, avoid placing pots in direct, scorching sun, as it can shorten the bloom life. Think of tulips like spring athletes—they need the right training (cold) followed by perfect game-day conditions (sunshine).
Common Problems and How to Fix Them
Preventing Rot and Mold
Rot is one of the biggest threats to tulip bulbs in pots. It usually happens when the soil stays too wet or lacks proper drainage. To prevent this:
- Always use pots with drainage holes.
- Avoid heavy, clay-rich soil.
- Don’t overwater, especially in winter.
- Remove any damaged or soft bulbs before planting.
Mold can also appear if bulbs are stored in damp conditions before planting. Keep bulbs dry and cool until you’re ready to use them. Prevention is always easier than treatment—healthy soil and proper care keep most problems away.
Protecting from Pests
Pests like squirrels, mice, and voles love digging up tulip bulbs. To protect them:
- Cover pots with chicken wire after planting.
- Place pots in sheltered areas out of reach of rodents.
- Use natural repellents like garlic spray or cayenne pepper around pots.
Should You Save the Bulbs?
After your tulips finish blooming, you may wonder if you can reuse the bulbs. The answer is yes, but with some effort. Tulips in pots often don’t return as strongly as those planted in the ground. However, if you want to try, allow the foliage to die back naturally after blooming. This process helps the bulb recharge for the next season. Don’t cut the leaves until they turn yellow and wither. During this time, continue watering lightly and even add fertilizer to feed the bulb. It’s like recharging a battery—without this step, the bulb won’t have enough energy for future growth.
Storing Bulbs for Next Season
Once the foliage has died down, you can lift the bulbs from the soil. Gently brush off excess dirt and allow them to dry in a cool, airy place for a few days. Then, store them in paper bags or mesh nets in a dark, dry, and cool location. Avoid plastic bags, as they trap moisture and encourage rot. Label your bulbs by variety to make planting easier next season. Proper storage gives the bulbs a fresh start when it’s time to plant again. With care, your tulip bulbs can keep brightening your home for years to come.
Creative Potting Ideas for Tulips
Mixing Tulips with Other Flowers
Tulips look stunning on their own, but they can also be paired with other spring flowers for a mixed display. Some great companions include:
- Daffodils – Cheerful yellow blooms that complement tulip colors.
- Hyacinths – Add fragrance and variety.
- Pansies and Violas – Perfect fillers for the pot surface.
- Grape Hyacinths (Muscari) – Create a blue carpet beneath tulips.
Decorative Arrangements for Balconies and Patios
Tulip pots can become eye-catching décor pieces. Arrange multiple pots in varying sizes for a layered display, or choose matching containers for a uniform look. For a modern touch, plant tulips in sleek, minimalist pots. For a rustic vibe, go with wooden crates or terracotta pots. You can even color-coordinate your tulips with your outdoor furniture or seasonal décor. Hanging baskets with mini tulips or arranging pots on tiered plant stands can save space and create visual drama. Think of your tulip pots as living art pieces—bright, cheerful, and always adaptable to your personal style.
Conclusion
Planting tulip bulbs in pots is one of the most rewarding gardening experiences, especially if you’re working with limited space. From choosing the right bulbs and soil mix to mastering watering and sunlight, every step plays a part in the final display. With proper care, tulips in pots can transform balconies, patios, and even windowsills into colorful spring showcases. The beauty of pot planting is flexibility—you can move them, mix them, and even store the bulbs for next season. Whether you’re a beginner or a seasoned gardener, tulips in pots offer a simple yet stunning way to enjoy nature’s artistry right at home. With the right preparation, your tulip pots will burst into vibrant blooms that brighten your days and bring the essence of spring closer to you.
FAQs
1. Can tulip bulbs bloom more than once in pots?
Yes, but they may weaken over time. Saving and replanting bulbs requires letting the foliage die back and storing them properly.
2. How many tulip bulbs should I plant in one pot?
It depends on the pot size, but typically you can plant bulbs close together, about 1–2 inches apart, for a fuller look.
3. Do tulip bulbs need to be chilled before planting?
In warm climates, yes. Bulbs need 8–10 weeks of chilling at 35–45°F to bloom properly.
4. Can I keep tulip pots indoors?
Yes, but they still need cold dormancy first. After chilling, you can force tulips indoors for early blooms.
5. What should I do with tulip pots after they bloom?
Let the foliage die back, then either store the bulbs for next season or replace them with summer flowers for continuous color.